VS Code + Codex on a Linux Server
Remote-SSH setup, authentication, configuration, and troubleshooting
A common research-computing workflow is to keep source code, Conda environments, datasets, checkpoints, and GPU workloads on a remote Linux server, while using VS Code on a local Windows machine as the editor.
With VS Code Remote-SSH, the interface stays on the local computer while the workspace, terminal, language servers, Git operations, and remote extensions operate against the Linux server. Codex can then be used in two complementary ways:
- through the Codex IDE extension in VS Code;
- through the Codex CLI in the remote Linux terminal.
The recommended architecture is:
Windows workstation
│
├── VS Code
│   └── Remote - SSH
│
└──────────── SSH ───────────────┐
                                 │
                            Linux server
                                 │
                 ┌───────────────┴───────────────┐
                 │                               │
          VS Code Server                    Codex CLI
                 │                               │
          remote extensions                ~/.codex/
                 │                               │
          Codex IDE extension              project files
                 │
          project files / Git /
          Python / Conda / CUDA
This note focuses on a remote research-server setup and includes a troubleshooting section for failures involving:
- SSH authentication;
- VS Code Remote-SSH;
codex: command not found;- the Codex extension not finding the remote executable;
- browser authentication on a headless server;
localhost:1455callback failures;- proxy/Mihomo environments;
- TLS, DNS, timeout, and connection-reset errors;
- Git and remote-environment issues.
Use:
Windows VS Code → Remote-SSH → Linux project → Codex IDE extension + Codex CLI
Use the IDE extension for code-context-aware editing and diff review. Keep the CLI installed and working on the server as the diagnostic baseline: if codex does not work in a normal remote shell, fix that before debugging the IDE integration.
1. Prerequisites
Local Windows machine
Install:
- Visual Studio Code;
- an OpenSSH-compatible SSH client;
- the Microsoft Remote - SSH extension;
- an SSH private key.
Remote Linux server
The server should provide:
- SSH access;
- a normal non-root account;
- Git;
- internet access, either directly or through a proxy;
- write permission to the project directory.
Before involving VS Code, verify ordinary SSH from Windows:
ssh username@server.example.comFor a custom SSH port:
ssh -p 2222 username@server.example.comThe command-line SSH connection should work reliably before continuing.
2. Configure SSH keys
2.1 Inspect existing keys
From Git Bash:
ls -la ~/.sshTypical files are:
id_ed25519
id_ed25519.pub
config
known_hosts
If no key exists:
ssh-keygen -t ed25519The Windows path is normally:
C:\Users\<WindowsUser>\.ssh\id_ed255192.2 Add the public key to Linux
If ssh-copy-id is available:
ssh-copy-id username@server.example.comOtherwise display the public key:
cat ~/.ssh/id_ed25519.pubAppend it on the server to:
~/.ssh/authorized_keysSet conservative permissions:
chmod 700 ~/.ssh
chmod 600 ~/.ssh/authorized_keys
Test again:
ssh username@server.example.com3. Configure ~/.ssh/config
On Windows, edit:
C:\Users\<WindowsUser>\.ssh\configA minimal configuration is:
Host lab-server
    HostName server.example.com
    User username
    Port 22
    IdentityFile ~/.ssh/id_ed25519
    ServerAliveInterval 60
    ServerAliveCountMax 3
For an IP address:
Host gpu01
    HostName 192.0.2.10
    User username
    IdentityFile ~/.ssh/id_ed25519
Test the alias:
ssh lab-serverlab-server is only a local alias and does not need to match the Linux hostname.
4. Connect with VS Code Remote-SSH
In local VS Code:
- install Remote - SSH;
- press
Ctrl+Shift+P; - run:
Remote-SSH: Connect to Host...- choose:
lab-serverAfter connection, the lower-left status area should indicate an SSH remote.
Figure Figure 1 shows the intended working state: VS Code is attached to a remote Linux workspace, the Codex extension is available inside the remote window, the editor shows a Codex-generated diff, and the integrated terminal is executing commands on the server.
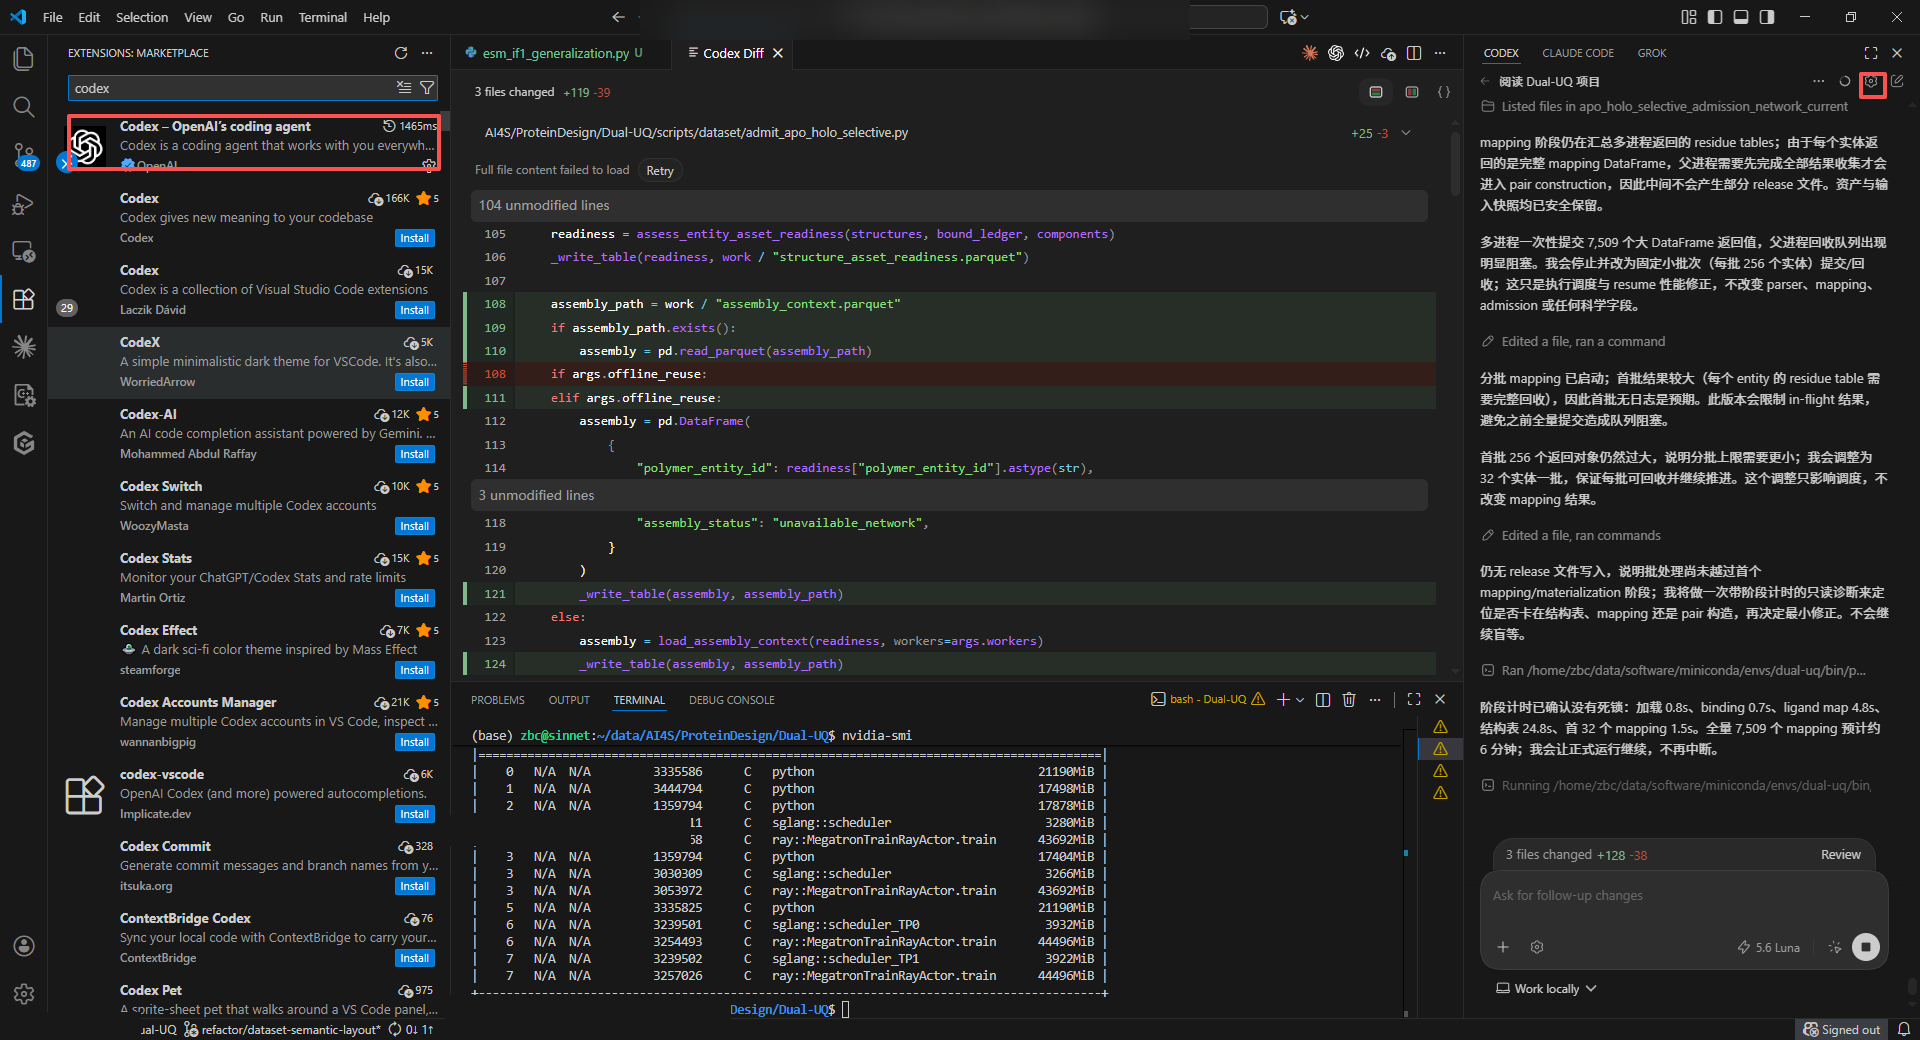
A useful visual confirmation is the remote status indicator in the lower-left corner of VS Code. The exact hostname varies by server; the important point is that the active VS Code window is attached through SSH rather than operating on the local Windows filesystem.
Open a remote terminal:
Terminal → New TerminalVerify the environment:
hostname
whoami
pwd
uname -a
echo "$HOME"
echo "$SHELL"
A typical Linux result is:
/home/username
/bin/bashBefore installing Codex or changing shell configuration, run:
hostname
pwd
uname -a
This prevents accidentally installing tools on Windows instead of on the Linux server.
5. Open the remote project
In the remote VS Code window:
File → Open Folder...Choose a project folder such as:
/home/username/projects/protein-designor:
/data/username/projects/protein-designFrom the remote terminal:
cd ~/projects
git clone <repository>
cd <repository>
git status
If the code command is available in the remote terminal:
code .Avoid opening very high-level filesystem roots such as /data if they contain many unrelated datasets and projects. Open the actual repository root instead.
6. Install Codex CLI on Linux
The current OpenAI standalone installer for macOS/Linux is:
curl -fsSL https://chatgpt.com/codex/install.sh | shAlternatively, if Node.js/npm is already available:
npm install -g @openai/codexVerify:
codex --versionLocate the executable:
command -v codex
which codex
The standalone installer commonly installs the visible command into:
~/.local/bin6.1 Verify remote-shell visibility
A useful test from Windows is:
ssh lab-server 'command -v codex && codex --version'If this fails while codex --version works in an interactive VS Code terminal, the problem is usually shell initialization or PATH visibility, not the Codex installation itself.
7. Fix codex: command not found
Inspect PATH:
echo "$PATH"Check the common installer location:
ls -l ~/.local/bin/codexSearch if necessary:
find "$HOME" -type f -name codex 2>/dev/null | headIf the binary is under ~/.local/bin, add it to Bash:
echo 'export PATH="$HOME/.local/bin:$PATH"' >> ~/.bashrc
source ~/.bashrc
For Zsh:
echo 'export PATH="$HOME/.local/bin:$PATH"' >> ~/.zshrc
source ~/.zshrc
Retest:
command -v codex
codex --version
Then test through a fresh SSH process:
ssh lab-server 'bash -lc "command -v codex && codex --version"'If the IDE still cannot find Codex after the shell test succeeds:
- close the remote VS Code window;
- reconnect with Remote-SSH;
- reload the remote window;
- verify the Codex extension is enabled in the SSH environment.
8. Authenticate Codex on a headless Linux server
Codex supports ChatGPT-account authentication and API-key authentication.
For a remote/headless server, device-code authentication is usually the simplest path:
codex login --device-authCodex prints a URL and a one-time code. Open the URL on the local Windows browser, sign in, and complete the device-code flow.
Check authentication:
codex login statusThen run:
codex8.1 Standard browser authentication
You can also run:
codex loginThis starts the normal browser-based login flow. On a remote server, the localhost callback can fail because the browser is on Windows while Codex is listening on Linux.
8.2 API-key authentication
For usage-based API billing:
export OPENAI_API_KEY="YOUR_API_KEY"
printenv OPENAI_API_KEY | codex login --with-api-key
unset OPENAI_API_KEY
Check:
codex login statusDo not place keys in:
README.md
AGENTS.md
tracked .env files
Git history
shell scripts committed to Git
9. Fix browser login and localhost:1455 callback errors
A common remote-login failure is:
browser opens successfully
→ login succeeds
→ browser redirects to localhost
→ connection refused / callback never reaches Codex
The reason is that localhost in the Windows browser means the Windows computer, whereas the Codex callback listener is running on the Linux server.
Preferred solution: device code
Use:
codex login --device-authFallback: SSH port forwarding
Open a new local terminal on Windows:
ssh -L 1455:localhost:1455 lab-serverInside that SSH session:
codex loginKeep the SSH tunnel open while completing authentication in the Windows browser.
Fallback: copy an existing auth cache
On a trusted machine where normal browser login works:
codex loginThe credential cache can exist at:
~/.codex/auth.jsonCopy it to the trusted remote machine:
ssh lab-server 'mkdir -p ~/.codex'
scp ~/.codex/auth.json lab-server:~/.codex/auth.json
Treat auth.json like a password. Never commit or share it.
10. Install and use the Codex VS Code extension
In the VS Code window already connected to Linux:
The official extension should be identified by the OpenAI publisher rather than by name alone, because the Marketplace also contains unrelated extensions with similar names.
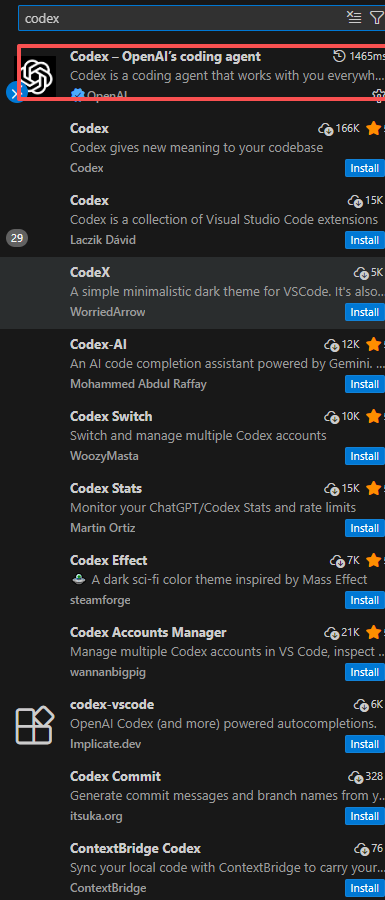
After installation, a typical remote workflow exposes the Codex panel on the right side of the VS Code window:
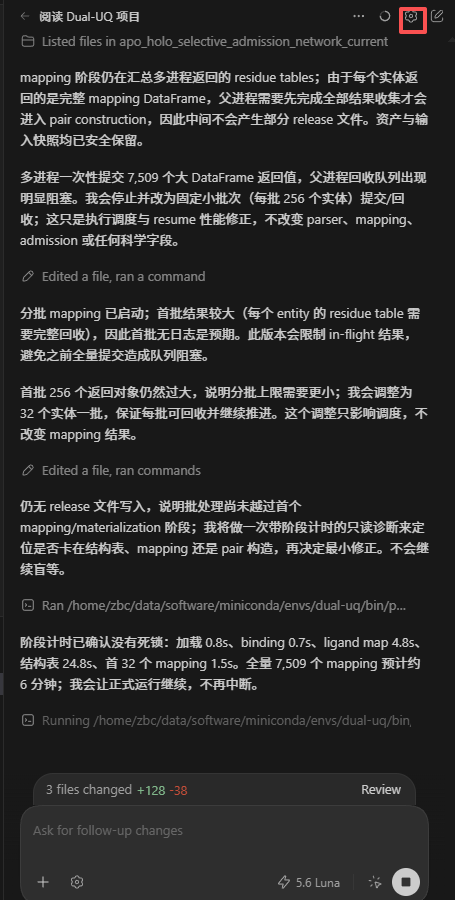
- open Extensions;
- install or enable the official Codex extension;
- open the Codex sidebar.
If the icon is hidden:
Ctrl+Shift+Pthen:
Codex: Open Codex SidebarThe IDE extension is useful because it can work with open files, selected code, editor context, and in-place diffs.
One useful IDE-specific capability is reviewing changes as a diff before accepting or committing them:
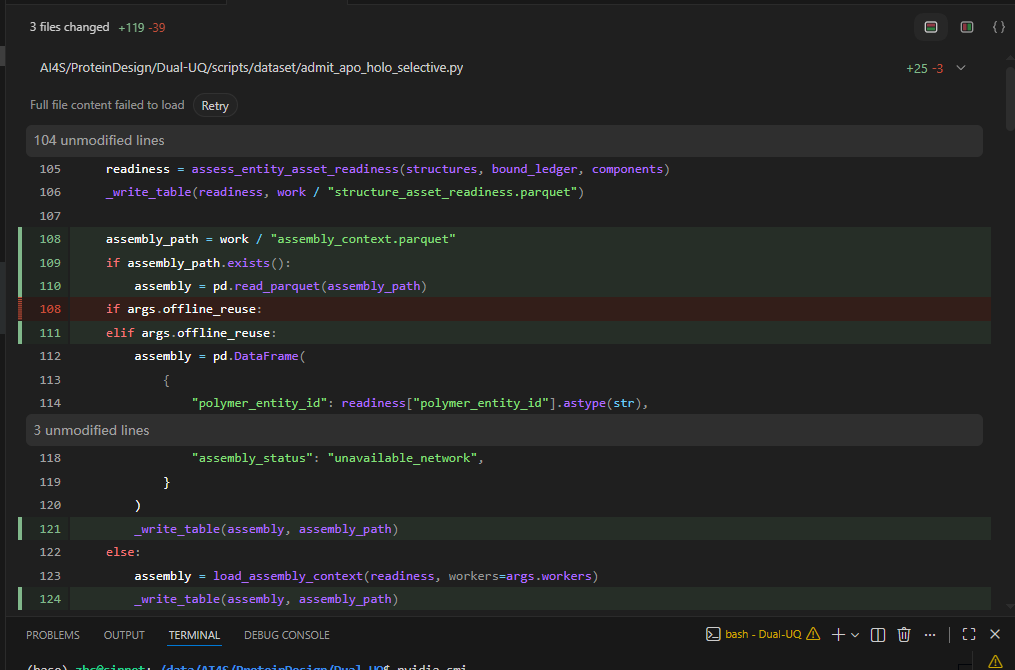
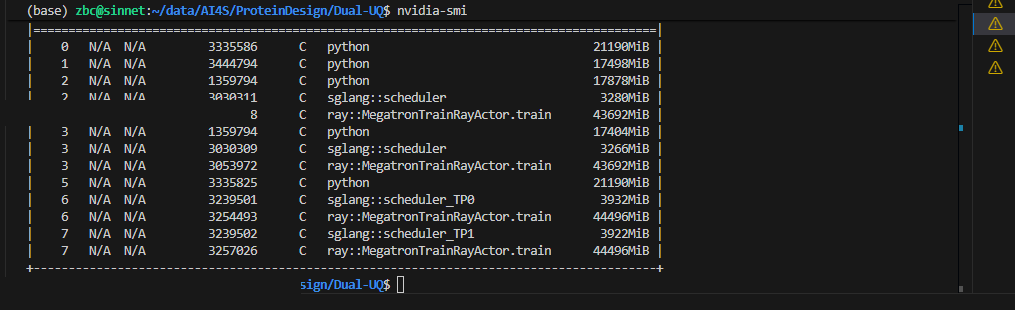
The integrated terminal remains an independent diagnostic surface. It is useful for checking the actual remote Python environment, GPU state, Git status, network connectivity, and the Codex CLI:
Useful requests include:
Explain the selected function and identify numerical-stability risks.
Do not modify any files.
Review the current Git diff and identify regressions.Refactor this module without changing the public API.
Run only the relevant unit tests.11. Local vs remote extension state
VS Code Remote-SSH has separate local and remote execution contexts.
In the Extensions view, distinguish:
Local
    Windows

SSH: lab-server
    Linux server
If Codex works locally but not in the remote workspace, inspect whether the extension is installed/enabled for the active SSH host.
After changing PATH, proxy variables, or Codex authentication, reconnect the Remote-SSH window so the remote extension host starts with a fresh environment.
12. Configure Codex
User-level configuration is stored in:
~/.codex/config.tomlCreate the directory:
mkdir -p ~/.codexEdit:
nano ~/.codex/config.tomlA conservative starting configuration is:
approval_policy = "on-request"
sandbox_mode = "workspace-write"

[sandbox_workspace_write]
network_access = false
This allows normal workspace edits while keeping generated command execution bounded and outbound network access disabled by default.
Inspect the active session inside Codex:
/statusInspect or change permissions:
/permissions12.1 Project-scoped configuration
A trusted repository may also use:
.codex/config.tomlFor example:
protein-design/
├── .codex/
│   └── config.toml
├── AGENTS.md
├── src/
├── tests/
└── README.md
Do not put credentials in project-scoped Codex configuration.
13. Add project instructions with AGENTS.md
Codex can automatically load repository instructions from AGENTS.md.
From the Codex CLI, a starter file can be scaffolded with:
/initFor a research repository, a practical version is:
# AGENTS.md

## Project

This repository contains protein-design and protein-language-model experiments.

## Environment

- Linux server
- Python 3.11
- PyTorch
- CUDA
- Conda environment: protein-design

## Safety

- Do not delete datasets or checkpoints.
- Do not modify files under `data/raw/`.
- Do not launch distributed or multi-GPU training unless explicitly requested.
- Do not install packages globally.
- Do not modify SSH credentials or proxy credentials.
- Ask before deleting files or rewriting Git history.

## Development

- Prefer the existing Conda environment.
- Run only lightweight tests unless a longer run is explicitly requested.
- Preserve existing configuration interfaces.
- Show the Git diff before a destructive refactor.
Commit it:
git add AGENTS.md
git commit -m "docs: add Codex project instructions"
14. Conda, Python, and GPU environments
Check Conda:
conda env listActivate the intended environment:
conda activate protein-designVerify:
which python
python --version
For PyTorch/CUDA:
python - <<'PY'
import torch
print("PyTorch:", torch.__version__)
print("CUDA available:", torch.cuda.is_available())
if torch.cuda.is_available():
    print("GPU:", torch.cuda.get_device_name(0))
PY
Tell Codex which environment to use:
Use the existing Conda environment `protein-design`.
Do not create a new environment.
Do not install packages globally.
For a shared GPU server:
Do not start training, distributed jobs, or GPU-intensive benchmarks.
You may inspect code and configuration, but ask before launching workloads.
For Slurm:
Do not run training directly on the login node.
Prepare or edit the sbatch script and show it to me before submission.
15. Use Codex with Mihomo or another proxy
This section is relevant when the Linux server cannot directly reach ChatGPT/OpenAI services and you are already running a local proxy such as Mihomo.
Assume Mihomo exposes:
127.0.0.1:7890as a mixed HTTP/SOCKS port.
For the current shell:
export HTTP_PROXY=http://127.0.0.1:7890
export HTTPS_PROXY=http://127.0.0.1:7890
export http_proxy=$HTTP_PROXY
export https_proxy=$HTTPS_PROXY
If SOCKS is required:
export ALL_PROXY=socks5h://127.0.0.1:7890
export all_proxy=$ALL_PROXY
Inspect:
env | grep -i proxyTest basic connectivity:
curl -I https://chatgpt.comand:
curl -I https://api.openai.comA response such as HTTP 401, 403, or another normal HTTP status still proves that DNS, TCP, TLS, and HTTP connectivity reached the remote service. A timeout, DNS error, or connection reset indicates a lower-level networking problem.
15.1 Make proxy variables available to Remote-SSH
Microsoft notes that local Windows proxy settings are not automatically reused by the remote host. Configure the proxy on Linux.
For Bash:
cat >> ~/.bashrc <<'EOF'
export HTTP_PROXY=http://127.0.0.1:7890
export HTTPS_PROXY=http://127.0.0.1:7890
export http_proxy=$HTTP_PROXY
export https_proxy=$HTTPS_PROXY
EOF
Reload:
source ~/.bashrcThen reconnect the VS Code Remote-SSH window.
Verify in the new remote terminal:
env | grep -i proxyIf Codex CLI works but the IDE extension still fails, fully close and reopen the remote VS Code window so its extension host is restarted with the updated environment.
15.2 Proxy helper functions
If you do not want the proxy enabled permanently:
proxy_on() {
    export HTTP_PROXY=http://127.0.0.1:7890
    export HTTPS_PROXY=http://127.0.0.1:7890
    export http_proxy=$HTTP_PROXY
    export https_proxy=$HTTPS_PROXY
    export ALL_PROXY=socks5h://127.0.0.1:7890
    export all_proxy=$ALL_PROXY
}

proxy_off() {
    unset HTTP_PROXY HTTPS_PROXY http_proxy https_proxy ALL_PROXY all_proxy
}
Then:
proxy_on
codex
Disable:
proxy_off16. Diagnostic workflow
When something fails, debug from the bottom of the stack upward.
Layer 1: SSH
From Windows:
ssh lab-serverLayer 2: remote shell
hostname
whoami
echo "$HOME"
echo "$SHELL"
Layer 3: internet
curl -I https://chatgpt.comLayer 4: Codex executable
command -v codex
codex --version
Layer 5: authentication
codex login statusLayer 6: Codex CLI
cd /path/to/project
codex
Layer 7: IDE integration
Only after the CLI works should you debug the VS Code Codex extension.
This ordering avoids treating a network, PATH, or authentication problem as an IDE-extension problem.
17. Troubleshooting by error message
17.1 Permission denied (publickey)
Check which key SSH uses:
ssh -vvv lab-serverConfirm:
Host lab-server
    HostName server.example.com
    User username
    IdentityFile ~/.ssh/id_ed25519
On Linux:
chmod 700 ~/.ssh
chmod 600 ~/.ssh/authorized_keys
Check that the correct public key is present:
cat ~/.ssh/authorized_keys17.2 SSH works in Git Bash but VS Code fails
Windows can contain multiple SSH clients.
Git Bash:
which ssh
ssh -V
PowerShell:
Get-Command ssh
ssh -V
VS Code may be invoking a different SSH binary than the one you tested.
Open:
View → Output → Remote - SSHInspect the executable and command VS Code actually launches.
17.3 Remote-SSH hangs while installing VS Code Server
Check remote internet access:
curl -I https://code.visualstudio.comCheck disk space:
df -hCheck quota where applicable:
quota -sIf the server is behind a proxy:
export HTTP_PROXY=http://127.0.0.1:7890
export HTTPS_PROXY=$HTTP_PROXY
Then reconnect.
Also inspect:
View → Output → Remote - SSH17.4 /tmp is mounted noexec
Some hardened servers prevent executing installer scripts from /tmp.
Check:
mount | grep ' /tmp 'If noexec is present, the VS Code Server installer may fail. This normally requires coordination with the server administrator or an approved alternative temp directory.
17.5 codex: command not found
Check:
ls -l ~/.local/bin/codex
echo "$PATH"
command -v codex
Fix:
export PATH="$HOME/.local/bin:$PATH"Persist for Bash:
echo 'export PATH="$HOME/.local/bin:$PATH"' >> ~/.bashrcReconnect VS Code after the change.
17.6 Codex works in terminal but the VS Code extension says it cannot find Codex
This usually indicates that the terminal and extension host started with different environments.
Test a fresh SSH shell:
ssh lab-server 'bash -lc "command -v codex && codex --version"'If that succeeds:
- close the remote VS Code window;
- reconnect;
- reload the window;
- confirm the Codex extension is enabled for
SSH: lab-server.
If it fails, fix the remote login-shell PATH first.
17.7 Failed to start Codex, spawn codex ENOENT, or similar startup errors
Interpret ENOENT first as “the process could not find the executable or a required path”.
Run:
command -v codex
ls -l "$(command -v codex)"
codex --version
Then:
ssh lab-server 'bash -lc "command -v codex"'If the CLI is installed through a user-specific package manager, ensure that package manager’s binary directory is available in the remote shell PATH.
17.8 Browser login succeeds but terminal waits forever
Prefer:
codex login --device-authIf standard login is required:
ssh -L 1455:localhost:1455 lab-serverand then on Linux:
codex login17.11 Could not resolve host
Check DNS:
getent hosts chatgpt.com
getent hosts api.openai.comAlso:
cat /etc/resolv.confTest:
curl -I https://chatgpt.comIf direct DNS is blocked but Mihomo is available, use the proxy and retest.
17.12 Connection timed out
Check general routing:
ip routeCheck proxy state:
env | grep -i proxyTest proxy:
curl -x http://127.0.0.1:7890 -I https://chatgpt.comIf this succeeds while a direct request fails, Codex needs the proxy environment.
17.13 Connection reset by peer / ECONNRESET
First determine whether the reset is specific to Codex:
curl -v https://chatgpt.comWith Mihomo:
curl -v -x http://127.0.0.1:7890 https://chatgpt.comIf proxying fixes the request, verify that Codex and the VS Code remote extension host inherit the same proxy variables.
17.14 TLS or certificate errors
Inspect:
curl -v https://chatgpt.comIf the network uses an institutional TLS-inspection proxy or private CA, Codex supports a custom CA bundle through:
export CODEX_CA_CERTIFICATE=/path/to/corporate-root-ca.pemThen:
codex loginOnly use a trusted CA bundle supplied by the institution or administrator.
17.15 CLI login fails with no obvious reason
Codex writes a login-specific diagnostic log.
Inspect the Codex log directory:
find ~/.codex -maxdepth 2 -type f | sortLook for:
codex-login.logDo not publish logs without reviewing them for sensitive metadata.
17.16 Extension installs locally but not remotely
In the Extensions panel, inspect both:
Local
SSH: lab-serverWhen VS Code offers Install in SSH: lab-server, use the remote installation where required by the extension.
Restart the remote extension host after installation.
17.17 Git push hangs in remote VS Code
If the repository uses an SSH key protected by a passphrase, some VS Code remote Git UI operations can wait for authentication.
Test from the remote terminal:
git status
git remote -v
git pushIf the terminal works reliably, use terminal Git commands for that server workflow.
17.18 Codex cannot run commands that require network access
Local Codex sandbox settings can intentionally disable network access.
Inspect:
/permissionsand:
/statusIf your configuration includes:
[sandbox_workspace_write]
network_access = falsethen network access from agent-generated commands is intentionally restricted.
Do not solve this by enabling unrestricted access globally unless the project requires it. Prefer explicit approval or narrowly scoped permissions.
18. Useful diagnostics to collect
Before asking for help, collect:
hostname
uname -a
cat /etc/os-releaseecho "$SHELL"
echo "$PATH"
env | grep -i proxycommand -v codex
codex --version
codex login statusgit status
git branch --show-currentFor SSH:
ssh -vvv lab-serverFor network:
curl -v https://chatgpt.comFor proxy:
curl -v -x http://127.0.0.1:7890 https://chatgpt.comWhen sharing diagnostics, redact:
- IP addresses if sensitive;
- usernames if sensitive;
- API keys;
- tokens;
auth.json;- private SSH keys;
- subscription URLs;
- cookies.
19. Recommended Git workflow with Codex
Before asking Codex to edit:
git status
git branch --show-currentFor substantial changes:
git switch -c codex/<task-name>Optionally create a checkpoint:
git add -A
git commit -m "checkpoint: before Codex changes"After Codex edits:
git status
git diffRun tests:
pytest -qStage intentionally:
git add <files>Review staged changes:
git diff --cachedCommit:
git commit -m "refactor: <description>"Avoid giving an agent a default workflow that rewrites Git history, force-pushes, deletes branches, or removes large directories without approval.
20. Use tmux for long Codex sessions
For long remote work:
tmux new -s codexThen:
cd ~/projects/<repository>
codexDetach:
Ctrl+B
DReconnect:
tmux attach -t codexThis keeps the shell session alive if VS Code or SSH disconnects.
21. Jump-host configuration
For an internal GPU node behind a login server:
Host login-server
HostName login.example.com
User username
IdentityFile ~/.ssh/id_ed25519
Host gpu-server
HostName gpu01.internal
User username
IdentityFile ~/.ssh/id_ed25519
ProxyJump login-serverTest:
ssh gpu-serverThen use gpu-server in VS Code Remote-SSH.
22. Recommended server layout
A clean user-level layout is:
/home/username/
├── .ssh/
├── .codex/
│ ├── config.toml
│ └── auth.json
└── projects/
└── protein-design/
├── .git/
├── .codex/
│ └── config.toml
├── AGENTS.md
├── src/
├── tests/
└── README.mdKeep large research artifacts outside Git:
/data/username/
├── datasets/
├── checkpoints/
└── outputs/Protect those locations explicitly in AGENTS.md.
23. Quick start
Windows SSH config
Host lab-server
HostName server.example.com
User username
IdentityFile ~/.ssh/id_ed25519Test:
ssh lab-serverVS Code
Ctrl+Shift+P
→ Remote-SSH: Connect to Host...
→ lab-serverRemote Linux terminal
Install Codex:
curl -fsSL https://chatgpt.com/codex/install.sh | shVerify:
command -v codex
codex --versionAuthenticate:
codex login --device-authCheck:
codex login statusOpen the project:
cd ~/projects/<repository>
git statusStart Codex:
codexThen install/enable the Codex VS Code extension in the active SSH workspace and open:
Codex: Open Codex Sidebar24. Minimal recovery sequence
When the setup suddenly stops working, run this sequence:
ssh lab-serverhostname
command -v codex
codex --versionenv | grep -i proxy
curl -I https://chatgpt.comcodex login statusIf login is broken:
codex logout
codex login --device-auth
If CLI works but VS Code does not:
Close remote window
→ reconnect Remote-SSH
→ verify Codex extension under SSH: lab-server
→ Codex: Open Codex Sidebar
If the CLI cannot reach the network but Mihomo is running:
export HTTP_PROXY=http://127.0.0.1:7890
export HTTPS_PROXY=$HTTP_PROXY
codex
This sequence isolates most failures into one of four categories:
SSH
PATH
network/proxy
authentication
References
- OpenAI Codex CLI documentation
- OpenAI Codex authentication documentation
- OpenAI Codex IDE extension documentation
- OpenAI Codex configuration reference
- OpenAI Codex AGENTS.md documentation
- OpenAI Codex sandbox and approvals documentation
- Microsoft VS Code Remote-SSH documentation
- Microsoft Remote Development troubleshooting